Update: バージョン0.10を用いた最新のインストール方法は、Phoenix.LiveViewの最新インストール方法で紹介しています。
Phoenix LiveViewによる動的サーバーサイドレンダリング2
「Phoenix LiveView による動的サーバーサイドレンダリング」の2回目です。
前回は LiveView を使用できるようになるための記述を行いました。
LiveView の利便性を実感するため、今回はあえて LiveView を使用しないで実装します。
LiveViewは、WebSocketを使用してサーバーとクライアント間の状態を同期します。
このような流れを自前で実装します。
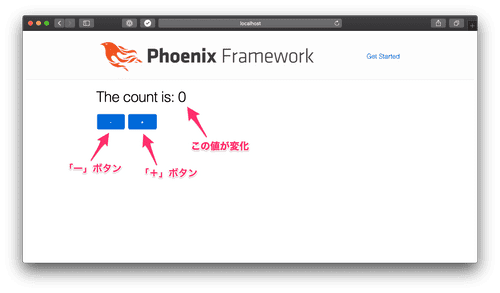
シンプルなカウンタを作成します。
動作としては、ご推察のとおり「ー」ボタンを押下するとページの再読み込みなしにカウント値が減少し、「+」ボタンを押下するとカウント値が増加します。
以下の要件を実装していきます。
http://localhost:4000/regular-counterからアクセスする- チャンネルを使用して機能を実装する
- チャンネルへのアクセスは
counter:regularから行う - セッション情報はページ表示時にランダム文字列を生成
- セッションとカウント値の管理はサーバー側で行う
- 値の保持は
Erlang Term Storage(ETS)を使う
まずはページ周りから実装します。
Routerから追加していきます。
# lib/lv_demo_web/router.ex
scope "/", LvDemoWeb do
  pipe_through :browser
  ...
  get "/regular-counter", RegularCounterController, :index  ...
endコントローラーを実装します。 Router で指定した、RegularCounterController を作成します。
# /lib/lv_demo_web/controllers/regular-counter-controller.ex
defmodule LvDemoWeb.RegularCounterController do
  use LvDemoWeb, :controller

  def index(conn, _params) do
    render(conn, "index.html", %{val: 0})
  end
endView を作成します。
# lib/lv_demo_web/views/regular_counter_view.ex
defmodule LvDemoWeb.RegularCounterView do
  use LvDemoWeb, :view
end
テンプレートを以下の内容で要素を作成します。
| 要素 | ID |
|---|---|
| カウンター領域 | regular-counter |
| カウンター値 | counter-val |
| デクリメントボタン | dec-btn |
| インクリメントボタン | inc-btn |
# lib/lv_demo_web/templates/regular_counter/index.html.eex
<div id="regular-counter">
  <h1>The count is: <span id="counter-val">0</span></h1>
  <button id="dec-btn">-</button>
  <button id="inc-btn">+</button>
</div>
認証は行いませんが、セッションの区別のためにランダム文字列を window.userToken に仕込みます。 仕込む場所は、LayoutView にします。 そのため、以下のハイライトで示した様に記述します。
# lib/lv_demo_web/templates/layout/app.html.eex
<!DOCTYPE html>
<html lang="en">
  <head>
    ...
  </head>
  <body>
    <header>
      ...
    </header>
    <main role="main" class="container">
      ...
    </main>
    <script>window.userToken = "<%= generate_token(32) %>"</script>    <script type="text/javascript" src="<%= Routes.static_path(@conn, "/js/app.js") %>"></script>
  </body>
</html>
generate_token は、LayoutView にて以下のように定義しました。
# lib/lv_demo_web/views/layout_view.ex
defmodule LvDemoWeb.LayoutView do
  use LvDemoWeb, :view
  def generate_token(length) do    :crypto.strong_rand_bytes(length)    |> Base.encode64    |> binary_part(0, length)  end

endクライアント側の実装に移ります。 JavaScript での実装になります。 ソースの配置場所は以下です。
asset/js
socket を作成します。
// assets/js/socket.js
import {Socket} from "phoenix"

let socket = new Socket("/socket", {params: {token: window.userToken}})

export default socket今回の機能のメイン部分です。 ここでは以下の事を行っています。
- ソケットの接続
- チャンネルのjoin
- ボタン要素がクリックされたら対応するイベントをチャンネルへプッシュ
update_counterイベントを受け取ったらDOMを更新
'use strict'

const counter = class Counter {

  constructor(socket) {
    if(!this._isTargetPage()) return;

    this._init(socket);
  }

  _isTargetPage() {
    return document.getElementById('regular-counter');
  }

  _init(socket) {
    socket.connect();

    const counterChannel = socket.channel(`counter:regular`);

    this._setupChannelCommunicator(counterChannel);

    counterChannel.join()
        .receive('ok', resp => {
        })
        .receive('error', reason => console.error('join failed', reason));
  }

  _setupChannelCommunicator(channel) {
    const incButton = document.getElementById('inc-btn');
    const decButton = document.getElementById('dec-btn');
    const valSpan   = document.getElementById('counter-val');

    this._registClickableElement(channel, incButton, 'increment');
    this._registClickableElement(channel, decButton, 'decrement');

    this._registUpdateElement(channel, valSpan, 'counter_updated');

  }

  _registClickableElement(channel, elm, eventName) {
    elm.addEventListener('click', e => {
      this._transmit(channel, eventName);
    });
  }

  _registUpdateElement(channel, elm, messageName){
    channel.on(messageName, ({ val }) => {
      elm.innerHTML = String(val)
    });
  }

  _transmit(channel, message) {
    const payload = {};
    channel.push(message, payload)
                  .receive('ok', r => {console.log(r)} )
                  .receive('error', e => console.error(e));
  }

};

export default counter;| 関数名 | 役割 |
|---|---|
| constructor(socket) | コンストラクタ |
| _isTargetPage() | 目的のページが表示されていればtrueを返す |
| _init(socket) |
|
| _setupChannelCommunicator(channel) | チャンネルへの送受信用の設定 |
| _registClickableElement(channel, elm, eventName) | クリック対応要素の登録 |
| _registUpdateElement(channel, elm, messageName) | 値が更新する要素の登録 |
| _transmit(channel, message) | サーバーへの送信処理 |
最後に app.js にてそれぞれを読み込みます。
// assets/js/app.js
import css from "../css/app.css"

import "phoenix_html"

import socket from "./socket"
import Counter from './counter';

const counter = new Counter(socket);
これで一通りの実装は完了です。
ここからチャンネル周りを実装していきます。 以下のチャンネルにアクセスするようにします。
counter:regular
counter:regular へのアクセスをCounterChannelに振り分けます。
# lib/lv_demo_web/channels/user_socket.ex
defmodule LvDemoWeb.UserSocket do
  use Phoenix.Socket

  channel "counter:regular", LvDemoWeb.CounterChannel

  def connect(%{"token" => token}, socket, _connect_info) do
    {:ok, assign(socket, :token, token)}
  end

  def id(socket), do: "counter_socket:#{socket.assigns.token}}"
endjoin 時は token をキーにしてレコードを作成し、値を0に設定します。
# lib/lv_demo_web/channels/counter_channel.ex
def join("counter:regular" , _params, socket) do
  socket.assigns[:token]
  |> initialize_count

  {:ok, socket}
end

defp initialize_count(token) do
  update_count([{token, 0}])
end

defp update_count([{token, count}]) do
  if :ets.insert(:counter_for_token, {token, count}) do
    [{token, count}]
  else
    []
  end
endイベントに応答する関数を実装します。
以下は increment の例です。
&(&1 + 1) という無名関数を渡しています。
def handle_in("increment", _params, socket) do
  handle_event(socket, &(&1 + 1))
end

defp handle_event(socket, updateFunc) do
  socket.assigns[:token]
  |> fetch_count
  |> apply_func_to_count(updateFunc)
  |> update_count
  |> push_to_client(socket)

  {:noreply, socket}
end

defp fetch_count(token) do
  :ets.lookup(:counter_for_token, token)
end

defp apply_func_to_count([{token, count}], updateFunc) do
  [{token, updateFunc.(count)}]
end
最後の push_to_client でブラウザ側に更新通知を行っています。
defp push_to_client([{_token, count}], socket) do
  push(socket,"counter_updated", %{val: count})
end全体は以下の様になります。
# lib/lv_demo_web/channels/counter_channel.ex
defmodule LvDemoWeb.CounterChannel do
  use LvDemoWeb, :channel

  def join("counter:regular" , _params, socket) do
    socket.assigns[:token]
    |> initialize_count
    {:ok, socket}
  end

  def handle_in("increment", _params, socket) do
    handle_event(socket, &(&1 + 1))
  end

  def handle_in("decrement", _params, socket) do
    handle_event(socket, &(&1 - 1))
  end

  defp handle_event(socket, updateFunc) do
    socket.assigns[:token]
    |> fetch_count
    |> apply_func_to_count(updateFunc)
    |> update_count
    |> push_to_client(socket)

    {:noreply, socket}
  end

  defp fetch_count(token) do
    :ets.lookup(:counter_for_token, token)
  end

  defp apply_func_to_count([{token, count}], updateFunc) do
    [{token, updateFunc.(count)}]
  end

  defp initialize_count(token) do
    update_count([{token, 0}])
  end

  defp update_count([{token, count}]) do
    if :ets.insert(:counter_for_token, {token, count}) do
      [{token, count}]
    else
      []
    end
  end

  defp push_to_client([], socket) do
    push(socket,"counter_updated", %{val: 0})
  end

  defp push_to_client([{_token, count}], socket) do
    push(socket,"counter_updated", %{val: count})
  end

endLiveView無しで、ページを動的に更新する機能を実装しました。
記述量はそれなりにありますが、定型化できそうな内容です。
どのプロジェクトでも行う初期化処理はライブラリを作成してそこに含めることができます。
プロジェクト毎に違う処理も、定型化できそうです。
というように考えながらセットアップの方法見返すと、作者の意図が見えてくるかも知れません。
この内容を踏まえて、Phoenix LiveViewを使用したカウンターの実装を行います。
